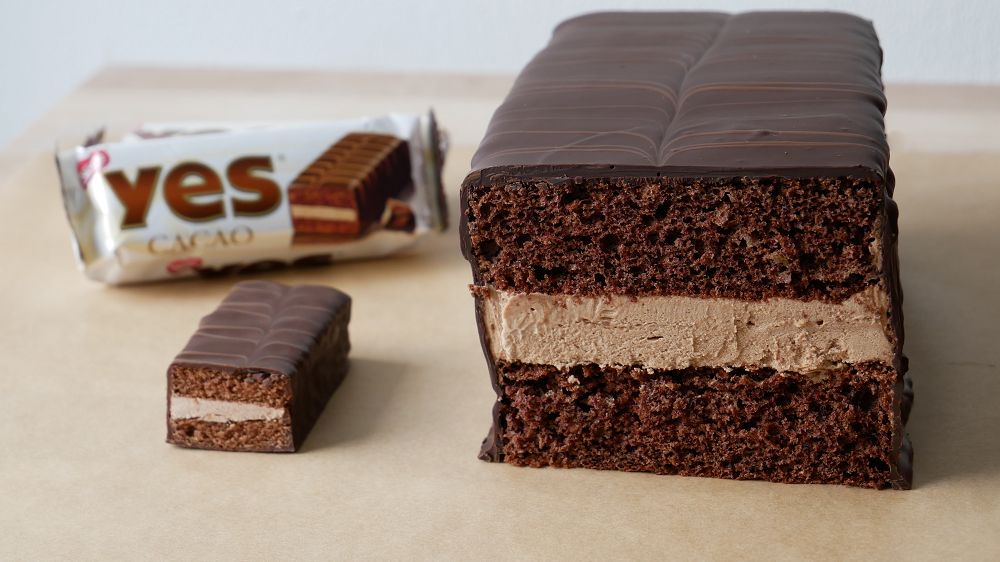
The Yes Cake Bar is a cake bar & consists of 2 layers of sponge cake, a layer of chocolatey cocoa cream in the middle & everything covered with dark chocolate.
In today’s post, I’ll show you how to bake a giant Yes Cake Bar with chocolate flavor at home. Have fun baking!
Cooked/Baked today: Homemade Giant Yes Cake Bar
Difficulty: Medium – Difficult
Preparation Time: 4 hours (incl. cooling time)
Category: Baking Recipes, Cake Recipes, Sweets
Our Recipe rating:
![]()

Homemade Giant Yes Cake Bar
Ingredients for 1 Homemade Giant Yes Cake Bar:
…for chocolate cream:
- 250 milliliters milk
- 150 grams soft butter
- 75 grams milk chocolate
- 30 grams cornstarch
- 1 sachet vanilla sugar
…for sponge cake:
- 3 eggs
- 100 grams sugar
- 75 grams flour
- 25 milliliters milk
- 1 heaping tablespoon cornstarch
- 1 heaping tablespoon cocoa powder
- 1 sachet vanilla sugar
- ½ sachet baking powder
- A few drops rum flavor
…more ingredients:
- 300 grams dark chocolate
- 25 grams milk chocolate for garnishing
Required kitchen gadgets, helper & preparations:
- Small pot or saucepan for chocolate pudding
- Clingfilm
- Mixing bowl
- Blender
- Whisk
- Sieve
- Baking sheet + baking paper
- Baking frame (dimensions approx. 25cm x 20cm)
- Clean kitchen towel
- Spatula + dough card
- 2 equal high coffee mugs + small cardboard plate
- Large pot + suitable bowl for the double boiler or microwave to melt chocolate
Instructions for the Homemade Giant Yes Cake Bar:
…for the chocolate pudding:
Coarsely chop 75 grams of whole milk chocolate. Mix together 30 grams cornstarch with 1 sachet vanilla sugar & 50 milliliters of milk in a small bowl. Next, put a small pot on the stove, add 200 milliliters of milk & 75 grams of chopped milk chocolate & heat up over low heat.

Cooking Chocolate Pudding
Allow the chocolate to melt, while stirring constantly & keep on stirring until the chocolate starts to simmer. Then pour in the prepared cornstarch mixture, stir in until free of lumps & the the mixture thickens, afterwards remove the saucepan from heat.
Transfer the chocolate pudding to a suitable bowl & cover the surface with a sheet of clingfilm to avoid forming a skin, then set pudding aside & allow to cool completely.
…for sponge cake:
Preheat the oven to 180°C (top/bottom heat) in good time. Line a baking sheet with parchment paper and place a baking frame (dimensions 25cm x 20cm) on it. In a large mixing bowl, combine 3 eggs, 100 grams sugar, 25 milliliters milk, 1 sachet vanilla sugar & a few drops rum flavor & mix together until fluffy with a blender or a kitchen machine for 3 – 4 minutes.
Next get a sieve & sift 75 grams flour, ½ sachet baking powder & a heaping tablespoon each of cornstarch & cocoa powder to the egg mixture. Use a whisk or spatula to gently fold in flour, cocoa powder & baking powder & then pour the mixture onto the prepared baking sheet.

Baking Sponge Cake
Put the sponge cake into the preheated oven for about 15 – 20 minutes, then remove it from the oven & allow to cool slightly. Remove the baking frame, for that drive along the edges with a blunt knife & then carefully overthrow sponge cake onto a clean kitchen towel.
Peel off the baking paper & cut the sponge cake sheet into 2 equal sized pieces (approx. 25cm x 10cm) with a knife, then set aside until further use.
…for chocolate cream:
Mix 150 grams of soft butter until creamy with a blender, then gradually add the cooled chocolate pudding in spoons and stir in until you got a creamy chocolate mixture.

Preparing Cream
Spread the chocolate cream onto one of the two sponge cake plates as smooth as possible and then gently press the second plate onto the cream. Straighten the excess cream on the edges with a dough card or knife & then wrap the “Yes” cake in baking paper & store in the fridge for approx. 2 hours & allow the cream to set.
…for the Yes Cake Bar:
After cooling time, melt 300 grams of dark chocolate over a water bath or in the microwave. Line the countertop with parchment paper, place 2 equally sized coffee mugs on it, also put a small cardboard plate (dimensions approx. 25cm x 10cm) for stabilization & finally place the Yes cake bar carefully on top of the cups.

Decorating Yes Cake Bar
Then pour the whole bar with the melted chocolate until the bar is completely covered. Afterwards for the typical pattern on the surface, additionally decorate the chocolate bar with a bit melted milk chocolate & with the help of a toothpick, centrally draw a line through the melted chocolate.
Finally remove the chocolate tips at the bottom of the bar, allow the Yes cake bar to harden completely and then serve. I wish you lots of fun baking 😉
Video Tutorial:
Watch the video tutorial to see the recipe and the preparation method precisely (German Audio only, English Subtitles available):


Ich danke dir für dieses tolle Rezept. Ich bewerte eigentlich nie, aber diese Torte hat mich umgehauen. Werde ich nun immer wieder machen.
Du hast echt super Ideen. Genau sowas will ich machen.😊
Das ist voll cool dass du sowas tolles machst.Aber wo ruhst du die dann alle hin? Tschüüs
Mega Rezept, mega einfach. hab nie gedacht das eine Torte so easy geht. das schwierigste ist allerdings die Schokoglasur da braucht man Übung